Setup
Preparation
Prepare the new Business Intelligence instance
The pre-configured i-Vertix Business Intelligence instance is available in OVA format for virtualization environments. Please contact our support (support@i-vertix.com) if you need other virtualization formats for your environment.
Please have a look at the system requirements when creating the new virtual machine.
If you need help on how to import the OVA into your VMware environment, please have a look at our How to import a Virtual appliance documentation
Prepare the Central Monitoring system
Install the new module
On the Monitoring Central System you need to install the i-Vertix Business Intelligence module:
sudo dnf install ivertix-bi-module ivertix-bi-connector-vmware-containers
After the install is complete, log into your monitoring system with an administrator account.
Perform the extension installation from the Extension Manager under AdministrationExtensionsManager and install the new Business Intelligence by i-Vertix extension.
Install the Business Intelligence Plugin Pack
To monitor your Business Intelligence system, we created a new plugin pack which you can download from the Plugin Store.
i-Vertix Business Intelligence Server
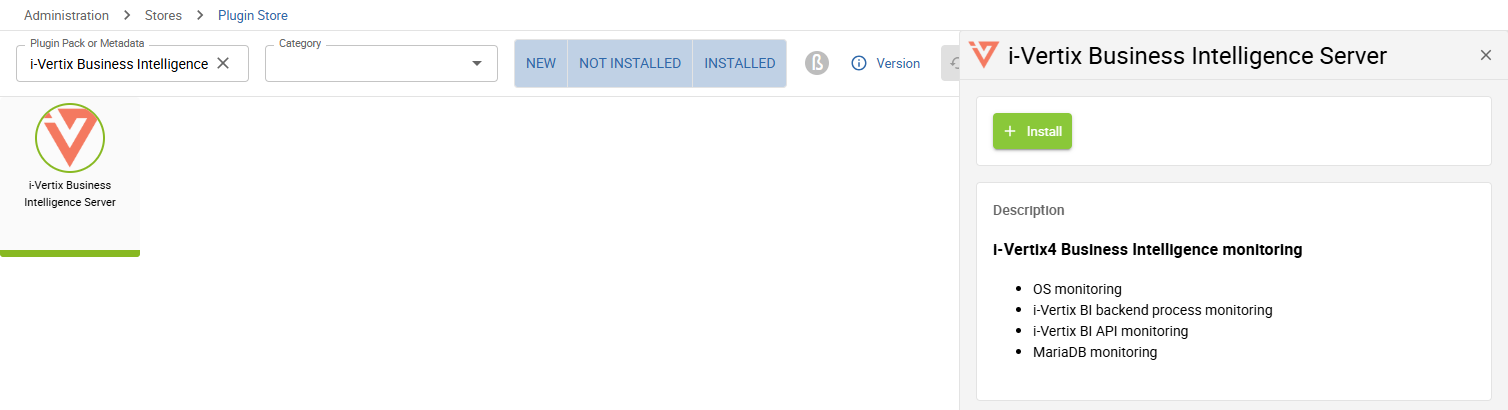
It is recommended to install the plugin pack right away so we can later keep focusing on the rest of the setup.
Configure the i-Veritx Business Intelligence system
After completing the virtual machine import and configuration, start the newly created virtual machine.
After the startup-process is completed, log into the command line of the i-Vertix BI system with the credentials provided by the i-Vertix team.
The following menu should appear:
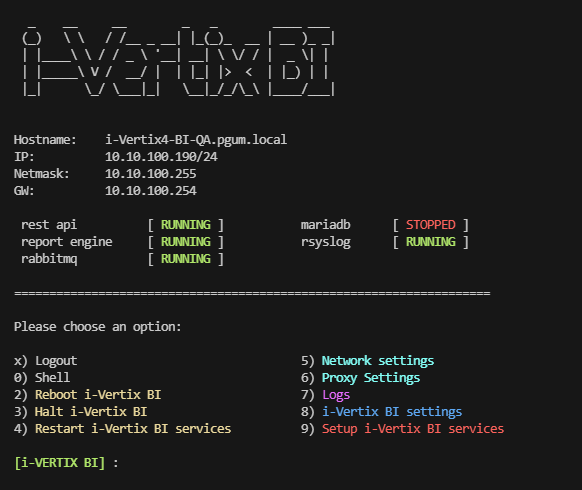
If the menu does not appear, or if you are in the normal command line interface, you can always re-open the menu with the command menu (which is a system alias)
Change password
The first real step after the initial system-startup should be changing the password.
To change the admin users password, select option 8) i-Vertix BI settings from the menu.
Now select option 3) change user password.
You can now enter your new password.
Network configuration
Next you need to configure the network settings for your newly imported i-Vertix business intelligence system.
When configuring the network, keep in mind that the i-Vertix BI system requires to connect to the Monitoring Central Server!
To change the network settings, select option 5) Network settings from the menu. The Network Manager should open.
-
Choose
Edit a Connection -
Select the Ethernet connection to edit (should be
ens192/ens33or similar) - navigate with keyboard arrows -
Configure following fields:
IPv4 CONFIGURATION: Manual
- Adresses: set the ip address
- Gateway: set the gateway address
- DNS server: set the DNS server
- Search domains: set the domain (if necessary)
- keep the rest unchecked
IPv6 CONFIGURATION: Ignore (or configure if necessary)
[x] Automatically connect [x] Available to all users
-
Confirm by selecting
<OK> -
Return to the Network Manager main screen by selecting
<Back> -
Quitthe Network Manager -
Confirm restarting the NetworkManager service to make your changes effective
From now on you should be able to connect via SSH (port 22) to the i-Vertix BI server (first you may need to configure your firewall)
Timezone settings
By default, the timezone is set to Europe/Rome.
If you need to change the timezone, select option 8) i-Vertix BI settings from the menu.
Now select option 2) change timezone.
You will be asked to enter the new timezone. Here is a list of valid TZ identifiers to insert: tz database on Wikipedia
Proxy settings
If you need to set a proxy server for your system, select option 6) Proxy settings from the menu.
You will be guided through the further process by the program itself.
Configure Bunsiness Intelligence Services and Database
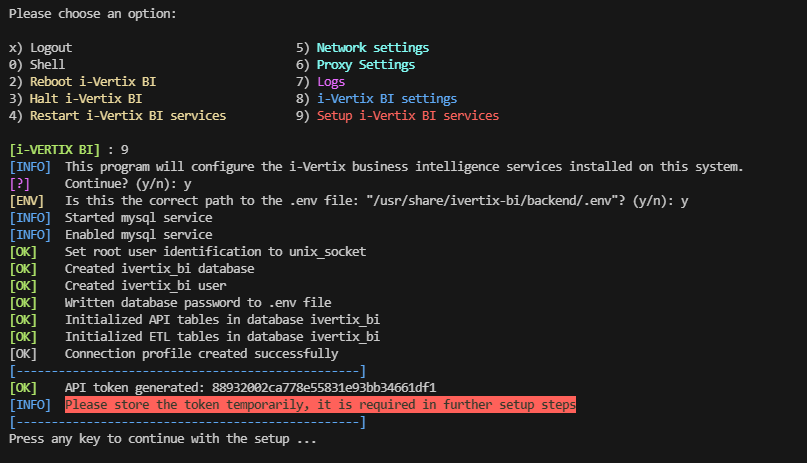
To simplify the setup process of the core services and the database, we have created a setup script that automates the configuration process.
During the setup you will be asked to store the API key temporarily. The API key is later needed while configuring the i-Vertix Business Intelligence module on the Monitoring system itself.
The setup is accessible from the menu:
-
Select option
9) Setup i-Vertix BI servicesYou will be asked for the correct path to the .env file, which is located by default in
/usr/share/ivertix-bi/backend/.env. If no custom modifications were made, you can simply accept the provided path. -
The database will now be configured automatically
-
A new API token is generated and printed on the screen. Please store the API token for a moment, this is important for the monitoring module setup!
-
Continue with the setup
-
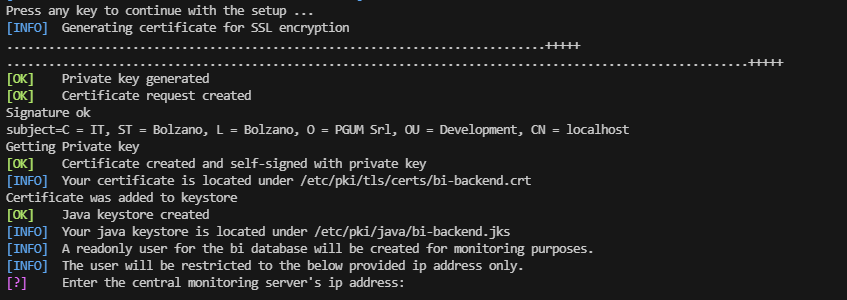
A new certificate will now be created used for SSL encryption.
You will be questioned some general information for the certificate. Please insert at least following information:
- Country Name (2 letter code, you can find all valid codes on iso.org)
- State or Province Name
- Locality Name
- Organization Name (company name)
- Common Name (server hostname)
- Email Address
All other fields can be left blank (enter
.or just skip the question by pressing Enter). -
You will now need to insert the IP address of the Central Monitoring server for the creation of a readonly database user on the BI database. This database user will be user to monitor the database of the BI server. By default, the BI server will be monitored from the Central poller. In case you want to monitor the BI server from another poller, use the IP of this poller instead.
After providing the IP address, the credentials of the readonly user will be printed on the screen. There is no need to save the credentials, they will be later imported automatically during the module setup.
-
The setup is now finished and the backend restarted.
If any problems happen during the setup, please contact us at support@i-vertix.com with the corresponding error messages.
Monitoring module setup
After finishing the above setup steps on the i-Vertix BI system you can now move on to the module setup part.
For that, log in to your i-Vertix monitoring platform using an account with admin privileges and navigate to Administrationi-VertixBusiness Intelligence.
The setup wizard should now appear.
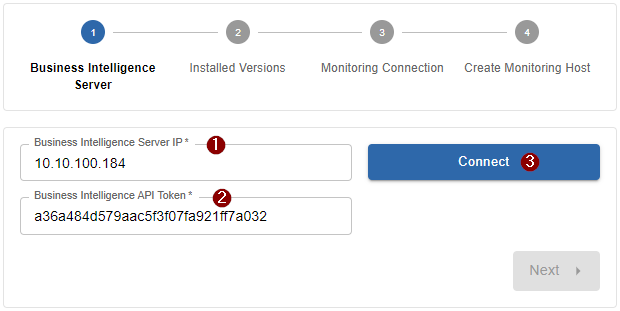
1st Step: Business Intelligence Server Connection
-
1 Insert the previous set-up ip address of the i-Vertix Business Intelligence Server
-
2 Insert the previously generated API token which was exposed during the setup program
noteIn case you no longer have access to the token (for whatever reason), you can re-run the setup on the Business Intelligence machine again. You will be asked if you'd like to re-generate a new token.
-
3 Click
Connectto test the connection
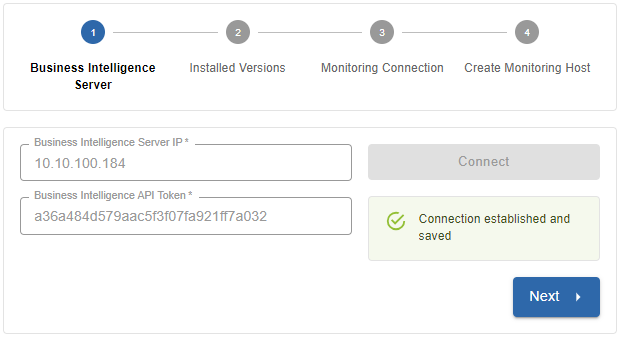
After a successful connection you can proceed with the next step by clicking Next.
If the connection cannot be established, head over to the Troubleshooting section which may help you finding the cause
2nd Step: Verify installed versions

Quick overview of the installed versions on your fresh i-Vertix BI server. Click Next to proceed with the next step.
3rd Step: Monitoring database connection
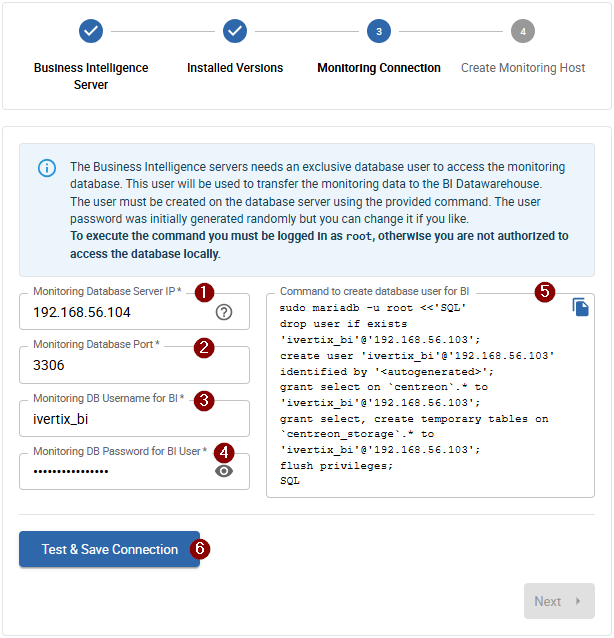
During this step the monitoring database connection for the BI server will be configured.
For that, a new database user must be configured on the monitoring database.
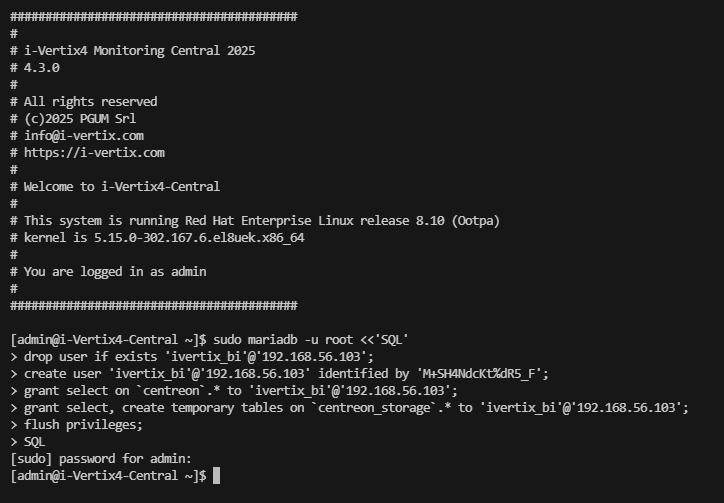
To create the new user with all required access permissions, a command is prepared for you, which you need to execute as root user on the database server.
Before copying and executing the command you must provide and/or verify the following information:
- 1 Monitoring database server IP address
-
Most probably your monitoring database is present on the monitoring server itself, in that case please insert the monitoring server IP (must be reachable by the BI server)
warningThe pre-filled Monitoring Database Server IP is not said to be always correct, please verify the IP closely. The BI server needs to access the monitoring database using this IP.
-
In case you have a remote database server architecture, use the IP of the remote database server (must be reachable by the BI server)
-
- 2 Monitoring database port (default
3306) - 3 Username (default
ivertix_bi) - 4 Password (pre-generated randomly, change as you like)
Copy now the 5 Command to create database user for BI and execute it on the monitoring database server.
After the query command was executed, you can click 6 Test & Save Connection to finish the step.
If the connection cannot be established, make sure you entered the correct Monitoring Database Server IP! The Business Intelligence server needs to be able to connect with the provided IP.
When the connection is saved, click Next to proceed with the next step.
4th Step: Monitor the i-Vertix Business Intelligence Server
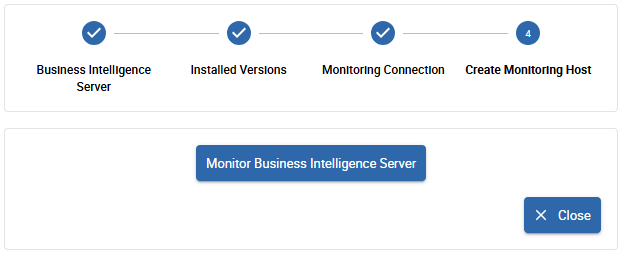
Almost done! The 4th and last step of the monitoring module setup is optional but highly recommended.
By monitoring the Business Intelligence Server you always have the most important components of the i-Vertix BI server in view.
Click the Monitor Business Intelligence Server button to create a pre-configured host to monitor the BI server.
Plugin Pack not installed yet
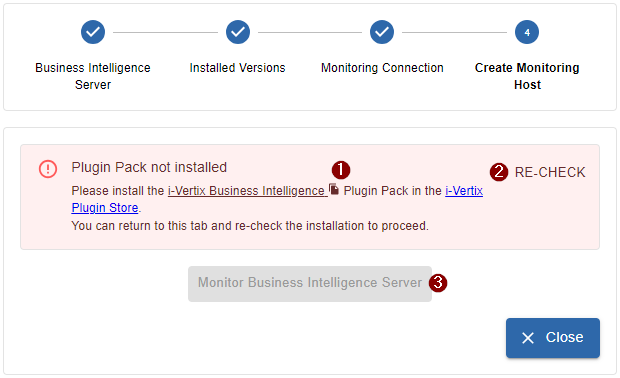
In case you did not already install the required Plugin Pack, head over to the i-Vertix Plugin Store (preferably in a new tab) and search for following plugin pack:
i-Vertix Business Intelligence Server
You can copy the name also by clicking on the file icon inside the alert 1.
After installing the plugin pack, return to the setup page and click on 2 Re-Check.
After the system has recognized that the plugin pack was installed,
click on 3 Monitor Business Intelligence Server to automatically create the monitoring host
with all relevant checks assigned.
The setup is now complete, you can 1 deactivate the maintenance mode now on the Maintenance tab.

To create your first report job, Report Templates are required. You can get them from the i-Vertix Report Store.