Create SNMP Traps definitions
Add a manufacturer
Within i-vertix, manufacturers file the root OIDs of the SNMP traps. To add a manufacturer, follow these steps:
Go into the Configuration > SNMP traps > Manufacturer menu and click on Add
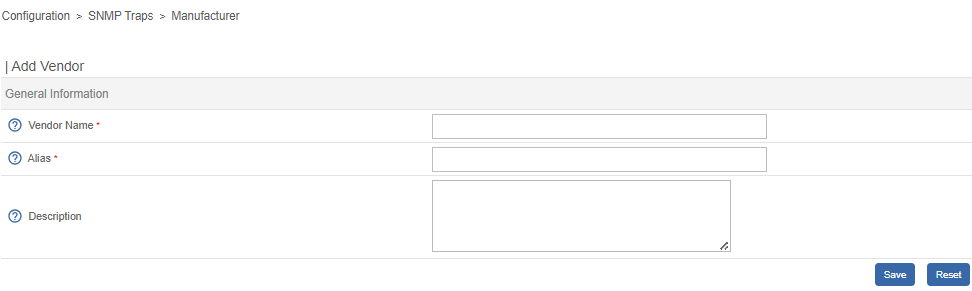
- The fields for Name and Alias define the manufacturer's name and alternate name.
- The Description field provides information about the manufacturer.
Import SNMP traps from a MIB file
Go into the Configuration > SNMP traps > MIBs menu

- The Manufacturer list allows you to select the manufacturer associated with the MIB that you are importing.
- Use the File (.mib) field to load the MIB.
Before importing a MiB file, it may require meeting various dependencies. To find these dependencies, open the MiB file with a standard text editor and:
- Locate the line that begins with IMPORTS.
- Verify all necessary dependencies for importing your MIB file after the keyword FROM.
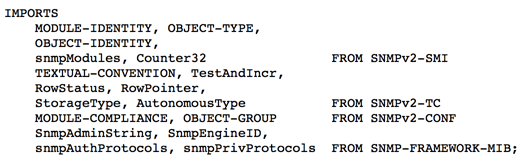
In the displayed MIB file, four dependencies are necessary for importing the MIB:
- SNMPv2-SMI
- SNMPv2-TC
- SNMPv2-CONF
- SNMP-FRAMEWORK-MIB
The imported MIBS' dependencies must exist in the /usr/share/snmp/mibs directory. After completing the import, remove the previously copied dependencies.
Manual configuration of traps
Basic configuration
It is possible to manually create definitions for SNMP traps:
Go into the Configuration > SNMP traps > SNMP traps menu and click on Add
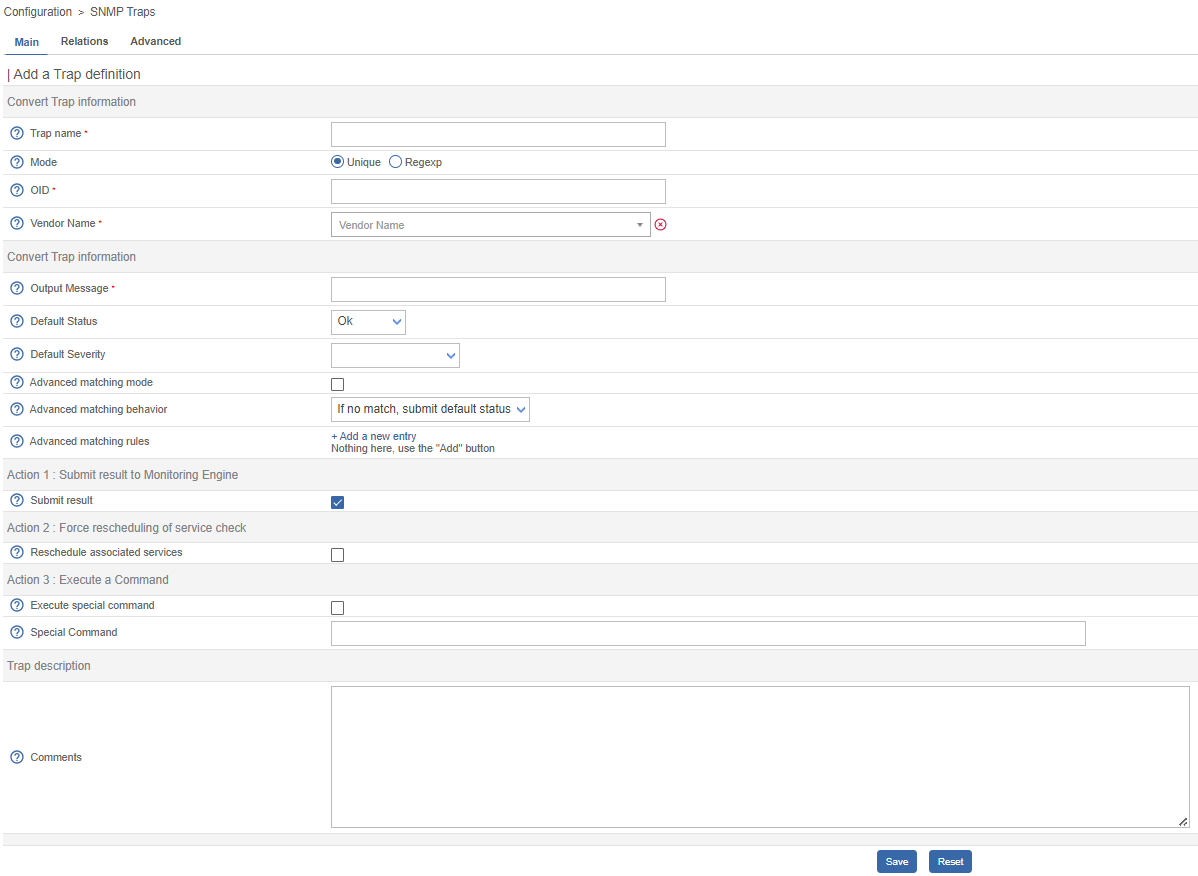
- The Trap Name field specifies the name of the trap
- The Mode field specifies how to validate the received trap OID
- The OID field defines the root OID that must be received for this trap to be considered received
- The Vendor name field specifies the manufacturer name for selecting the trap in the drop-down menu. belongs
- The Output message field contains the message to be displayed upon receiving a trap. OID.
By default, the MIB contains the definition of this variable (E.g.: "Link up on interface $2. State: $4.", here $2 will be replaced by the 2nd argument received in the event.). In the opposite situation, the variable $ can be used to display all the arguments contained in the trap.
It is possible to construct the output message yourself. For this, use the MIB to know the arguments that will be present in the body of the event and retrieve the arguments with the variables $n.
As each argument is identified by a OID, it is possible to use this OID directly to place it in the output message without knowing its position via the variable @{OID}.
- The Default status field defines the monitoring status of the service in case of reception of the trap.
- If the Submit result box is checked the result is submitted to the Network supervisor engine.
- The Comments field (last field) contains by default the comment by the manufacturer of the SNMP trap. Most of the time, this comment indicates the list of variables contained in the SNMP trap (see the next chapter on advanced configuration).
Advanced configuration of the traps
It is possible to determine service status by analyzing SNMP trap settings instead of the Root OID. In the past, manufacturers defined SNMP traps (Root OID) based on the type of event to be sent (linkUp / linkDown). Nowadays, Root OID is defined by event category with specific event configurations.
To do this, it is possible of define Advanced Matching mode by clicking on Add a new entry and creating as many rules as necessary. For each rule, define the settings:
- String defines the element on which the search will be applied (@OUTPUT@ defined all the Output messages translated).
- Regexp defined the REGEXP type search to be applied.
- Status defines the status of the service in the event of concordance.
The order is important in the rules of correspondence because the process will stop at the first rule of which the correspondence is assured.
- The Disable submit result if no matched rules feature prevents the transmission of information to the scheduling engine unless a matching rule has been confirmed
- If the Reschedule associated services checkbox is selected, promptly reprogram the next check on the "active" service after receiving the trap
- If the Execute special command box is checked, the command defined in Special command is executed.
Advanced tab
The Advanced tab configures how SNMP traps are handled upon reception.
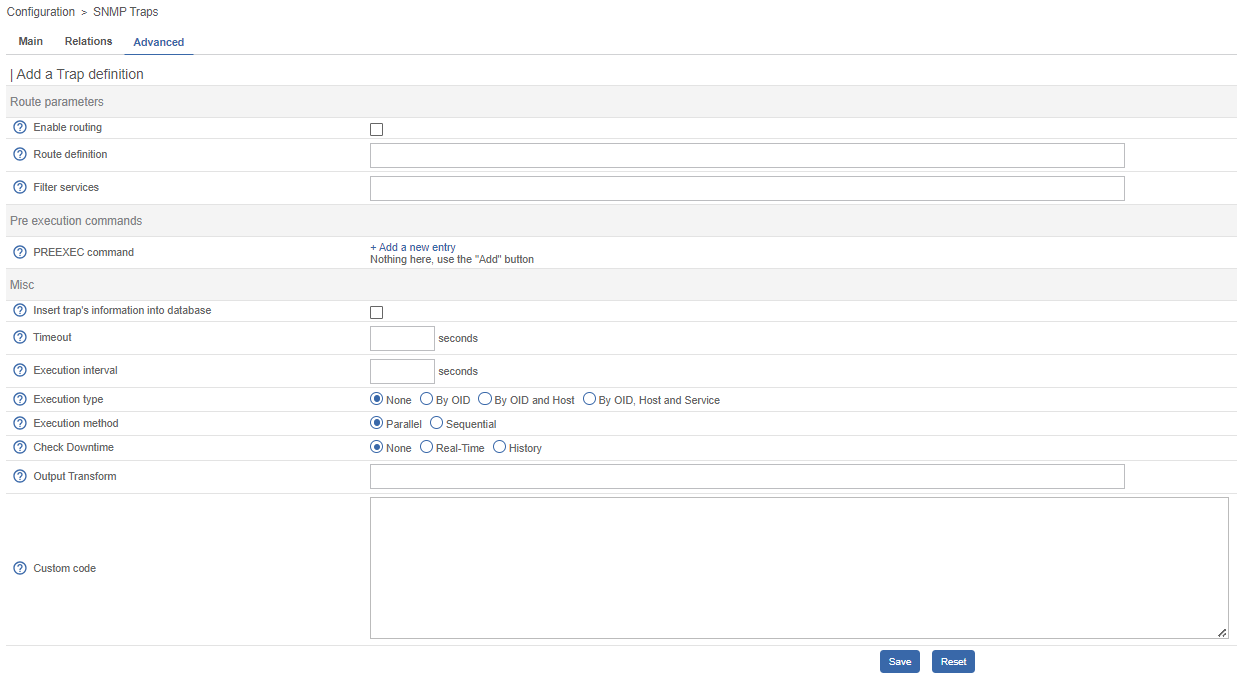
- Enable routing enable the routing of information
- Route definition define the command to be used for routing.
Before processing the event (translating the Output message), it's possible to execute the PREEXEC command. Define the PREEXEC command (SNMPTT type) by selecting Add a new entry and creating as many rules as needed.
- PREEXEC command defines the command to be executed.
Here is an example of use with the linkUP trap:
For a Cisco equipment, $2 == ifDescr contains the port number of the interface (GigabitEthernet0/1 for instance).
The best description of the interface is in the SNMP if Alias field.
The following command can be used to retrieve this value:
snmpget -v 2c -Ovq -c <community> <cisco switch> ifAlias.$1
To use the result of the PREEXEC command in the Output message, it is necessary to use the variable $p{n} where n
corresponds to the order of definition of the command.
Example:
"Interface $2 ( $p1 ) linkUP. State: $4." "$CA"
The result will have the form: Interface GigabitEthernet0/1 ( NAS Server ) linkUP. State: up
- If the Insert trap's information into database box is checked, the SNMP trap information will be recorded in the database field. This can be used to determine whether or not to classify the traps by day in the database
- The Timeout field expressed in seconds, specifies the maximum processing time of the event, including pre-processing commands (PREEXEC) and post-processing commands (special command)
- The Execution Interval field, measured in seconds, defines the maximum wait time between two processing operations for an event
- The Execution Type field enables the Execution interval by defining conditions using the Root OID, the Root OID and host combination or, to disable this restriction, None.
- The Execution Method field determines whether multiple identical events (Root OID) are processed mode can be Sequential or Parallel.
Custom code
The field custom code allows custom Perl processing.
To enable this feature, you must set secure_mode to 0 in /etc/centreon/centreontrapd.pm file as:
our %centreontrapd_config = (
    ...
    secure_mode => 0,
    ....
);

1;
For example, to decode the 4 hexadecimal arguments, the custom code would be:
if ($self->{trap_data}->{entvar}->[3] =~ /[[:xdigit:]]+/) {
    my $hexa_value = $self->{trap_data}->{entvar}->[3];
    $hexa_value =~ s/ //g;
    $self->{trap_data}->{entvar}->[3] = pack('H*', $hexa_value);
}
Beware the argument table starts at 0 for argument 1 of the SNMP trap.
Variables
When adding a rule of correspondence or executing a special command it is possible to transmit arguments to the String or Special command fields. These arguments are listed in the table below:
| Macro name | Description |
|---|---|
@{NUMERIC_OID} | Retrieval of the value of an argument via its OID, e.g.: @{.1.3.6.1.4.1.9.9.43.1.1.1} |
$1, $2... | Retrieval of the value of an argument via its order of appearance |
$p1, $p2,... | Value of the command: PREEXEC ($p1 = at the first command, $p2 at the second, ...) |
$* | All the arguments separated by a space |
@HOSTNAME@ | Host name (in i-vertix) to which the service is attached |
@HOSTADDRESS@ | IP address of the host sending the trap |
@HOSTADDRESS2@ | DNS name of the host sending the trap (if the server fails to effect a reverse DNS resolution we retrieve the IP address) |
@SERVICEDESC@ | Service name |
@TRAPOUTPUT@ ou @OUTPUT@ | Output of the traps |
@STATUS@ | Service state |
@SEVERITYNAME@ | Criticality name |
@SEVERITYLEVEL@ | Criticality level |
@TIME@ | Trap reception timestamp |
@POLLERID@ | ID of the poller having received the trap |
@POLLERADDRESS@ | IP address of the poller having received the trap |
@CMDFILE@ | Path to the command file of central or of centreon Engine (collector) |
In addition, there are special variables that can be used in the Routing settings section at the level of the Routing command if the option Enable routing is selected:
| Macro name | Description |
|---|---|
@GETHOSTBYADDR($1)@ | Reverse DNS resolution used to find the DNS name DNS from the IP address (127.0.0.1 -> localhost) |
@GETHOSTBYNAME($1)@ | DNS resolution used to find the IP address from the DNS name (localhost -> 127.0.0.1) |