Setup
Installation
The pre-configured i-Vertix Business Intelligence instance is available in OVA format for virtualization environments. Please contact our support (support@i-vertix.com) if you need other virtualization formats for your environment.
Please have a look at the system requirements when creating the new virtual machine.
If you need help on how to import the OVA into your VMware environment, please have a look at our How to import a Virtual appliance documentation
Configure your system
After completing the virtual machine import and configuration, start the newly created virtual machine.
After the startup-process is completed, log into the command line of the i-Vertix BI system with the credentials provided by the i-Vertix team.
Following menu should appear:
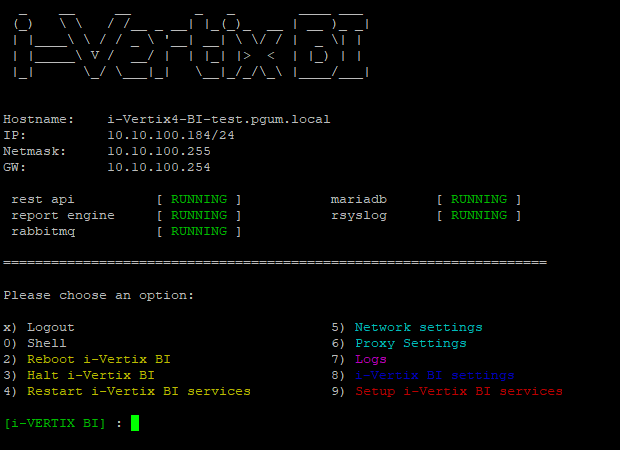
If the menu does not appear or if you are in the normal command line interface, you can always re-open the menu with the command menu (which is a system alias)
Change password
The first real step after the initial system-startup should be changing the password.
To change the admin users password, select option 8) i-Vertix BI settings from the menu.
Now select option 5) change user password.
You can now enter your new password.
It is strongly recommended to choose a strong password, as there is no further SSH restriction (such as ssh-keys) implemented.
Network configuration
Next you need to configure the network settings for your newkly imported i-Vertix business intelligence system.
Keep in mind that the i-Vertix BI system requires a connection to the Monitoring Central Server!
To change the network settings, select option 5) Network settings from the menu. The Network Manager should open.
-
Choose
Edit a Connection -
Select the Ethernet connection to edit (should be
ens192/ens33or similar) - navigate with keyboard arrows -
Configure following fields:
IPv4 CONFIGURATION: Manual
- Adresses: set the ip address
- Gateway: set the gateway address
- DNS server: set the DNS server
- Search domains: set the domain (if necessary)
- keep the rest unchecked
IPv6 CONFIGURATION: Ignore (or configure if necessary)
[x] Automatically connect [x] Available to all users
-
Confirm by selecting
<OK> -
Return to the Network Manager main screen by selecting
<Back> -
Quitthe Network Manager -
Confirm restarting the NetworkManager service to make your changes effective
From now on you should be able to connect via SSH (port 22) to the i-Vertix BI server (first you may need to configure your firewall)
Timezone settings
By default, the timezone is set to Europe/Rome.
If you need to change the timezone, select option 7) i-Vertix BI settings from the menu.
Now select option 2) change timezone.
You will be asked to enter the new timezone. Here is a list of valid TZ identifiers to insert: tz database on Wikipedia
Proxy settings
If you need to set a proxy server for your system, select option 6) Proxy settings from the menu.
You will be guided through the further process by the program itself.
Configure the i-Vertix BI services and the monitoring module
API & Reporting Engine
To simplify the setup process of our i-Vertix services, we have created a setup script that does most of the work for you.
To complete this step the i-Vertix Business Intelligence module needs to be fully installed and licensed on the Monitoring system. If it isn't already you should take care of it now.
To launch the setup script, which configures the REST API and the report engine, select option 9) Setup i-Vertix BI services from the menu.
You will be asked for the corret path to the .env file, which is located by default in /usr/share/ivertix-bi/backend/.env. If no custom modifications were made, you can simply accept the provided path.
After accepting, the database will be initialized and configured.
If any problems happen during the database setup, please contact us at support@i-vertix.com with the corresponding error messages.
After the database was initialized, the API token will be generated and printed on the screen.
It is very important to copy and store the API token for a moment because it is needed in the further setup process (monitoring module setup).
The API token will only be exposed once during the setup. Afterwards it is not possible to retrieve it again. If the token gets lost, a new API token must be generated.
After the token was created, the SSL encryption certificate will be created.
You will be questioned some general information for the certificate. Please insert at least following information:
- Country Name (2 letter code, you can find all valid codes on iso.org)
- State or Province Name
- Locality Name
- Organization Name (company name)
- Common Name (server hostname)
- Email Address
All other fields can be left blank (enter . or just skip the question by pressing Enter).
Next you will be asked for the host address, which interacts with the BI server. The ip address is used to create a new readonly database user for monitoring purposes. The requested ip address should be the ip address of the Central Monitoring Server, as seen by this server.
After this step is complete, the setup is finished and the API service is started automatically.
There is no need to copy and store the generated readonly database password.
Monitoring module setup
After finishing the above setup steps on the i-Vertix BI system you can now move on to the module setup part.
For that, log in to your i-Vertix monitoring platform using an account with admin privileges.
Head over to Administration -> i-Vertix -> Business Intelligence.
The setup wizard should now appear.
1st Step: Business Intelligence Server Connection
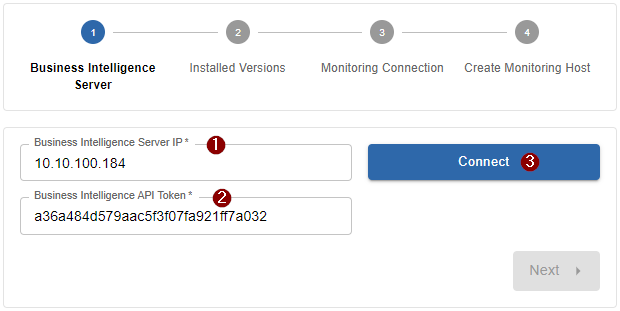
- 1 Insert the previous set-up ip address of the i-Vertix Business Intelligence Server
- 2 Insert the previously generated API token which was exposed during the setup program
- 3 Click
Connectto test the connection
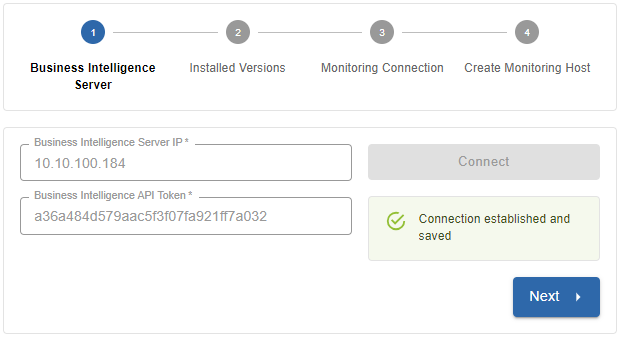
After a successful connection you can proceed with the next step by clicking Next.
If the connection cannot be established, head over to the Troubleshooting section which may help you finding the cause
2nd Step: Verify installed versions

Quick overview of the installed versions on your fresh i-Vertix BI server. Click Next to proceed with the next step.
3rd Step: Monitoring database connection
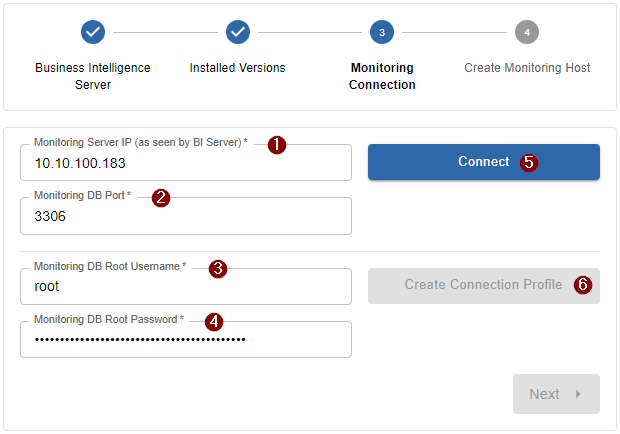
- 1 Insert the central monitoring server ip address as seen by the i-Vertix BI server (same ip address which was requested during the BI server setup process). By default the current Browser address is used, this address is not always the right one
- 2 Insert the monitoring database port (default
3306) - 3 Insert the monitoring database superadmin/root username (default
root) - 4 Insert the monitoring database superadmin/root password (consult the i-Vertix team)
- 5 Click
Connectto test the database connection from the i-Vertix BI server to the central monitoring server
If the connection cannot be established, head over to the Troubleshooting section which may help you finding the cause
- 6 After the connection is established, click
Create Connection Profile. In the background, a new dedicated user is created on the central monitoring database for the i-Vertix BI system.
After successfully creating the connection profile, click Next to proceed with the next step. Eventual errors during the creation process will be displayed on the wizard itself.
4th Step: Monitor the i-Vertix Business Intelligence Server
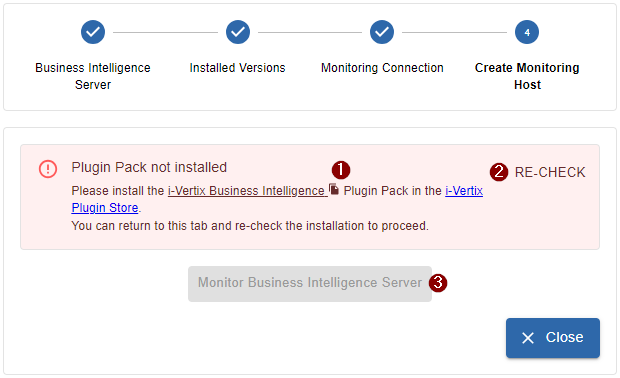
Almost done! The 4h and last step of the monitoring module setup is optional but highly recommended!
By monitoring the Business Intelligence Server you always have the most important components of the i-Vertix BI server in view.
If you don't already have the dedicated Plugin Pack installed, head over to the i-Vertix Plugin Store (preferably in a new tab) and
search for the i-Vertix Business Intelligence plugin pack (you can copy the plugin pack name by clicking on the file icon inside
the alert 1).
After installing, return to the setup page, click on 2 Re-Check.
After the system has recognized, that the plugin pack was installed,
click on 3 Monitor Business Intelligence Server to automatically create the monitoring host
with all relevant checks assigned.
The setup is now complete and almost everything is ready now for your first report job.
To create your first report job, Report Templates are required. You can get them from the integrated i-Vertix Report Store.